hippo4j 动态线程池原理解析
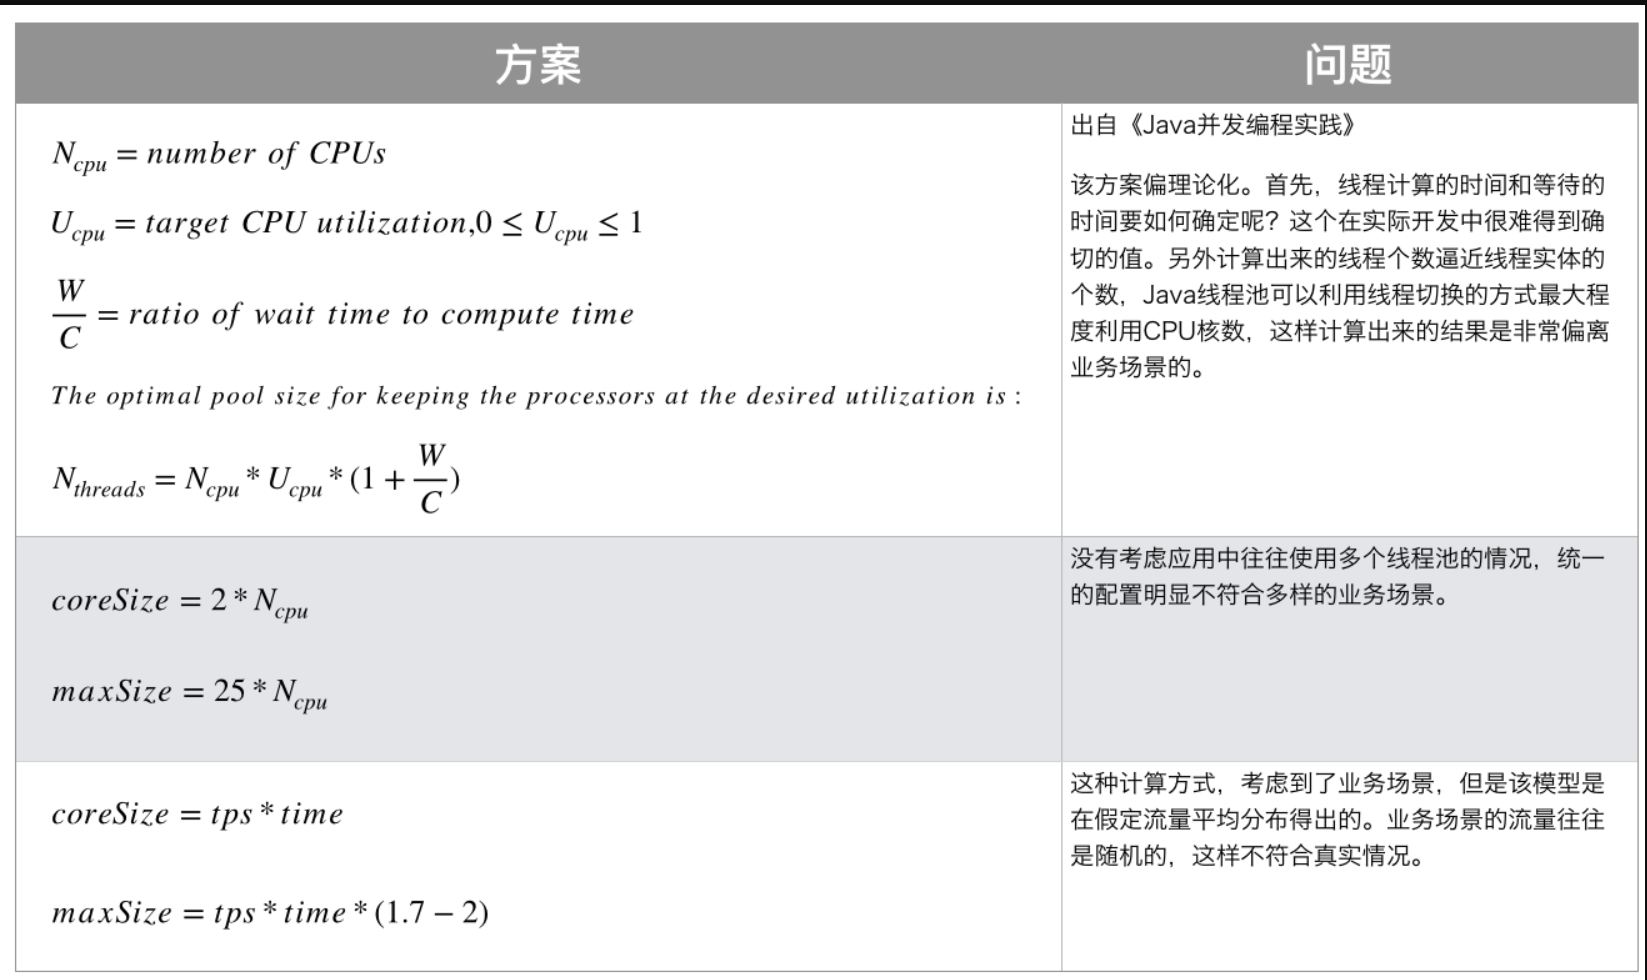
动态线程池介绍 线程池技术通过池化技术可以重复利用创建的线程,减少频繁创建销毁线程造成的开销,提高线程的可管理性,进而提高系统性能。但是如何根据系统的实际运行情况配置线程池参数并不容易,尽管有一些经验公式:
CPU 密集型任务:核心线程数 = CPU核心数 + 1
IO密集型任务:核心线程数 = CPU核心数 \* (1 + (I/O等待时间 / 计算时间)) 或者简单设置为核心线程数 = CPU核心数 \* 2
但实际的业务场景是很复杂的,并不好估算任务的计算时间和等待时间,而且一台机器上也可能运行了不止一个服务,同时业务流量也是动态改变的。
美团技术团队的文章Java线程池实现原理及其在美团业务中的实践 中提到了动态化的线程池:
动态化线程池的核心设计包括以下三个方面:
简化线程池配置:线程池构造参数有8个,但是最核心的是3个:corePoolSize、maximumPoolSize,workQueue,它们最大程度地决定了线程池的任务分配和线程分配策略。考虑到在实际应用中我们获取并发性的场景主要是两种:(1)并行执行子任务,提高响应速度。这种情况下,应该使用同步队列,没有什么任务应该被缓存下来,而是应该立即执行。(2)并行执行大批次任务,提升吞吐量。这种情况下,应该使用有界队列,使用队列去缓冲大批量的任务,队列容量必须声明,防止任务无限制堆积。所以线程池只需要提供这三个关键参数的配置,并且提供两种队列的选择,就可以满足绝大多数的业务需求,Less is More。
参数可动态修改:为了解决参数不好配,修改参数成本高等问题。在Java线程池留有高扩展性的基础上,封装线程池,允许线程池监听同步外部的消息,根据消息进行修改配置。将线程池的配置放置在平台侧,允许开发同学简单的查看、修改线程池配置。
增加线程池监控:对某事物缺乏状态的观测,就对其改进无从下手。在线程池执行任务的生命周期添加监控能力,帮助开发同学了解线程池状态。
为此我调研了以下发现了 hippo4j 这一开源的动态可观测线程池,下面将结合源码分析该线程池的设计原理:
hippo4j 介绍 hippo4j 通过对 JDK 线程池增强,以及扩展三方框架底层线程池等功能,为业务系统提高线上运行保障能力, 其提供了以下功能支持:
全局管控 - 管理应用线程池实例。
动态变更 - 应用运行时动态变更线程池参数,包括不限于:核心、最大线程数、阻塞队列容量、拒绝策略等。
通知报警 - 内置四种报警通知策略,线程池活跃度、容量水位、拒绝策略以及任务执行时间超长。
运行监控 - 实时查看线程池运行时数据,最近半小时线程池运行数据图表展示。
功能扩展 - 支持线程池任务传递上下文;项目关闭时,支持等待线程池在指定时间内完成任务。
多种模式 - 内置两种使用模式:依赖配置中心 和 无中间件依赖 。
容器管理 - Tomcat、Jetty、Undertow 容器线程池运行时查看和线程数变更。
框架适配 - Dubbo、Hystrix、RabbitMQ、RocketMQ 等消费线程池运行时数据查看和线程数变更。
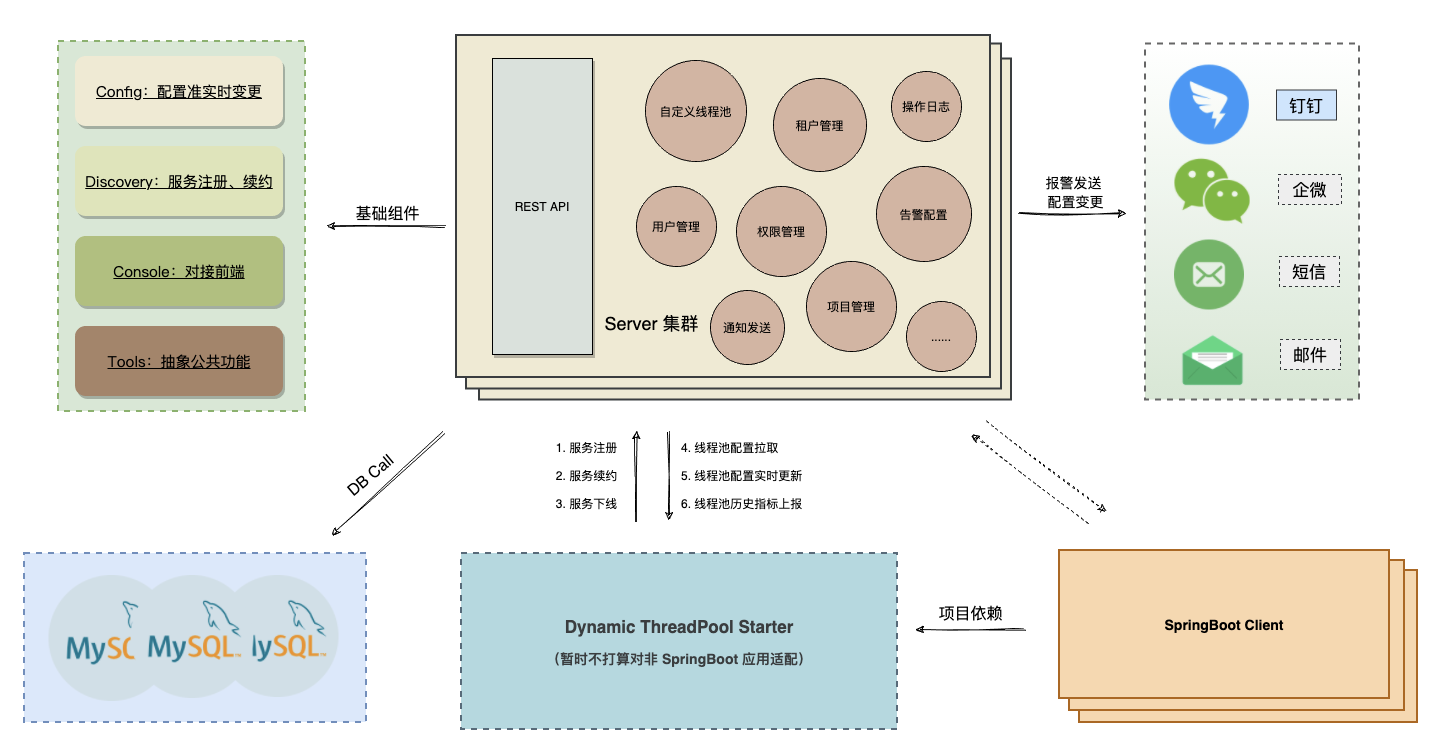
Hippo4j 是基于Spring boot 开发的一个插件,并以 spring-boot-starter 的形式嵌入到用户的spring-boot应用中,从部署的角度上分为两种角色:Server 端和 Client 端:
Server 端是 Hippo4j 项目打包出的 Java 进程,功能包括用户权限、线程池监控以及执行持久化的动作。
Client 端指的是我们 SpringBoot 应用,通过引入 Hippo4j Starter Jar 包负责与 Server 端进行交互。
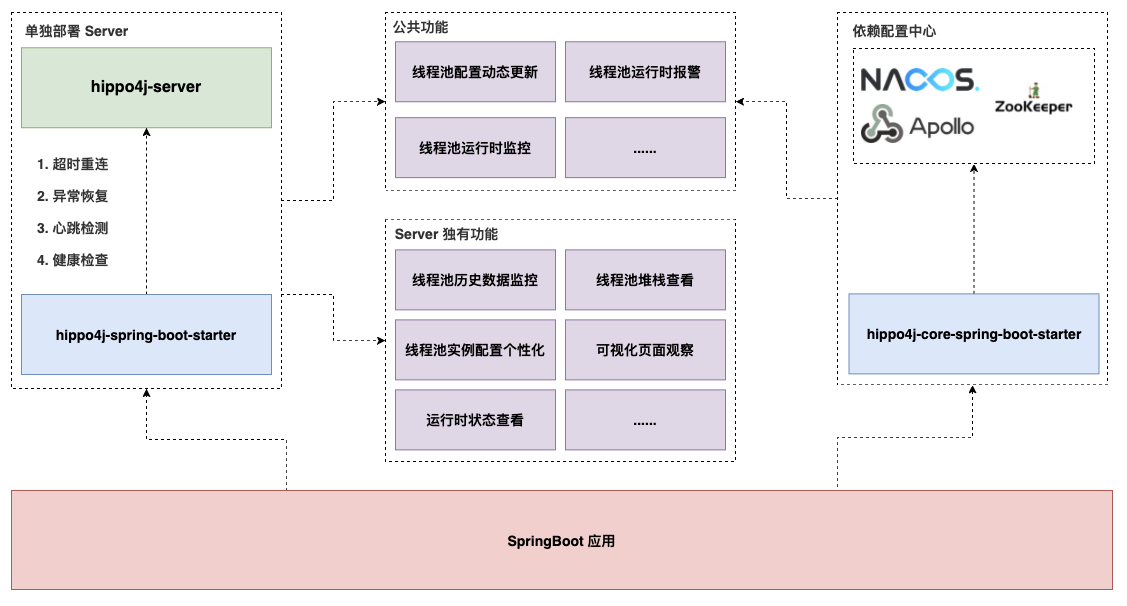
根据官方文档,其功能架构如下:
1.1.0 版本发布后,Hippo4j 分为两种使用模式:轻量级依赖配置中心以及无中间件依赖版本,我的理解是轻量级的配置方案提供及基本的动态线程池功能,但是需要依靠配置中心来进行配置,并需要 grafana 等来进行数据可视化监控,为无依赖中间件版本相当于自己加了一套前后端系统,可以在其管理面板上进行配置,其在核心功能的基础上增加了一些小功能,方便用户使用。为了简洁期间,本文就以轻量级的配置方案为基础进行解析。
运行原理 hippo4j 是基于 spring-boot-starter 运行的,在cn.hippo4j.config.springboot.starter 的 spring.factories 文件中,可以看到:
org.springframework.boot.autoconfigure.EnableAutoConfiguration=cn.hippo4j.config.springboot.starter.config.DynamicThreadPoolAutoConfiguration,\
cn.hippo4j.core.config.UtilAutoConfiguration,\
cn.hippo4j.message.config.MessageConfiguration,\
cn.hippo4j.springboot.starter.adapter.web.WebAdapterConfiguration,\
cn.hippo4j.config.springboot.starter.config.MonitorConfiguration
hippo4j starter 中声明了以下五个类来让 Spring Boot 扫描并加载:
DynamicThreadPoolAutoConfiguration
UtilAutoConfiguration
MessageConfiguration
WebAdapterConfiguration
MonitorConfiguration
我们首先来看下 DynamicThreadPoolAutoConfiguration 这个类, 这个自动配置类注入了很多Bean:
@Configuration @AllArgsConstructor @ConditionalOnBean(MarkerConfiguration.Marker.class) @EnableConfigurationProperties(SpringBootstrapConfigProperties.class) @Import(ConfigHandlerConfiguration.class) @ConditionalOnProperty(prefix = BootstrapConfigProperties.PREFIX, value = "enable", matchIfMissing = true, havingValue = "true") public class DynamicThreadPoolAutoConfiguration {}
我们来看下这个类上的注解:
@Configuration 声明是一个配置类@AllArgsConstructor 提供一个全部参数的构造方法@EnableConfigurationProperties(SpringBootstrapConfigProperties.class) 把使用了@ConfigurationProperties 的SpringBootstrapConfigProperties类进行了一次注入@ConditionalOnBean(MarkerConfiguration.Marker.class) 如果 Spring 容器中已经存在MarkerConfiguration.Marker这个类的话,才会注入@ConditionalOnProperty(prefix = BootstrapConfigProperties.PREFIX, value = "enable", matchIfMissing = true, havingValue = "true") BootstrapConfigProperties.enable 为 true 才注入@Import(ConfigHandlerConfiguration.class) 导入ConfigHandlerConfiguration类
其中@ConditionalOnBean(MarkerConfiguration.Marker.class) 表示容器中存在Marker这个类的话才会注入,那这个类是在哪里注入的呢?答案在启动类的注解上:
@SpringBootApplication @EnableDynamicThreadPool public class ExampleApplication { public static void main (String[] args) { SpringApplication.run(ExampleApplication.class, args); } }
@EnableDynamicThreadPool 注解中通过@Import导入了两个类,其中包括MarkerConfiguration类,这个类注入了Marker这个Bean:
@Target(ElementType.TYPE) @Retention(RetentionPolicy.RUNTIME) @Documented @Import({BeforeCheckConfiguration.class, MarkerConfiguration.class}) public @interface EnableDynamicThreadPool {}
@Configuration public class MarkerConfiguration { @Bean public Marker dynamicThreadPoolMarkerBean () { return new Marker (); } public class Marker { } }
回过来看DynamicThreadPoolAutoConfiguration类都注入了哪些Bean,其实这些Bean就是hippo4j的核心实现了。
ApplicationContextHolder——获取Bean 其首先通过@Order注解注入了一个最高优先级的ApplicationContextHolder Bean,其实现了Spring 的ApplicationContextAware接口,当 Spring 发现ApplicationContextHolder实现了这个接口后,就会调用这个Bean的setApplicationContext方法 ,将容器本身的ApplicationContext传递给这个类,之后我们就可以很方便的通过ApplicationContextHolder对象获取容器中的Bean,具体来说该类提供了如下几个方法:
setApplicationContext(ApplicationContext applicationContext) 用于 Spring 传递 ApplicationContextgetBean(Class<T> clazz)getBean(String name, Class<T> clazz)Map<String, T> getBeansOfType(Class<T> clazz)<A extends Annotation> A findAnnotationOnBeanApplicationContext getInstance()
Hippo4jDynamicThreadPoolInitializer——执行初始化逻辑 hippo4j 中通过注入 Hippo4jDynamicThreadPoolInitializer 对象来执行初始化逻辑,这个类实现了 InitializingBean接口,提供了afterPropertiesSet()方法,当该bean被创建并完成依赖注入(所有属性被设置之后),spring 容器会调用这个afterPropertiesSet方法,这样就可以实现一些自定义的初始化逻辑。
public class Hippo4jDynamicThreadPoolInitializer implements InitializingBean { @Override public void afterPropertiesSet () throws Exception { ConfigurableEnvironment environment = ApplicationContextHolder.getBean(ConfigurableEnvironment.class); EnvironmentProperties.active = environment.getProperty("spring.profiles.active" , "UNKNOWN" ); EnvironmentProperties.itemId = environment.getProperty("spring.dynamic.thread-pool.item-id" , "" ); EnvironmentProperties.applicationName = environment.getProperty("spring.application.name" , "" ); EnvironmentProperties.checkStateInterval = environment.getProperty("spring.dynamic.thread-pool.check-state-interval" , Long.class, 5L ); IdentifyUtil.getIdentify(); ThreadPoolCheckAlarm threadPoolCheckAlarm = ApplicationContextHolder.getBean(ThreadPoolCheckAlarm.class); threadPoolCheckAlarm.scheduleExecute(); } }
在这个初始化逻辑中主要做了三件事:
从环境变量中读取一些配置,放到 EnvironmentProperties 中去
生成 client 的 唯一 id
调度运行 ThreadPoolCheckAlarm
DynamicThreadPoolConfigService——提供了注册线程池的方法 public class DynamicThreadPoolConfigService extends AbstractDynamicThreadPoolService { @Override public ThreadPoolExecutor registerDynamicThreadPool (DynamicThreadPoolRegisterWrapper registerWrapper) { DynamicThreadPoolRegisterParameter registerParameter = registerWrapper.getParameter(); String threadPoolId = registerParameter.getThreadPoolId(); ThreadPoolExecutor dynamicThreadPoolExecutor = buildDynamicThreadPoolExecutor(registerParameter); ExecutorProperties executorProperties = buildExecutorProperties(registerWrapper); ThreadPoolExecutorRegistry.putHolder(threadPoolId, dynamicThreadPoolExecutor, executorProperties); DynamicThreadPoolRegisterCoreNotifyParameter notifyParameter = registerWrapper.getConfigNotify(); ThreadPoolNotifyAlarm notifyAlarm = new ThreadPoolNotifyAlarm (true , registerParameter.getActiveAlarm(), registerParameter.getCapacityAlarm()); notifyAlarm.setReceives(notifyParameter.getReceives()); notifyAlarm.setInterval(notifyParameter.getInterval()); GlobalNotifyAlarmManage.put(threadPoolId, notifyAlarm); return dynamicThreadPoolExecutor; } private ExecutorProperties buildExecutorProperties (DynamicThreadPoolRegisterWrapper registerWrapper) { DynamicThreadPoolRegisterParameter registerParameter = registerWrapper.getParameter(); ExecutorProperties executorProperties = ExecutorProperties.builder() .corePoolSize(registerParameter.getCorePoolSize()) .maximumPoolSize(registerParameter.getMaximumPoolSize()) .allowCoreThreadTimeOut(BooleanUtil.toBoolean(String.valueOf(registerParameter.getAllowCoreThreadTimeOut()))) .keepAliveTime(registerParameter.getKeepAliveTime()) .blockingQueue(BlockingQueueTypeEnum.getBlockingQueueNameByType(registerParameter.getBlockingQueueType().getType())) .queueCapacity(registerParameter.getCapacity()) .threadNamePrefix(registerParameter.getThreadNamePrefix()) .rejectedHandler(RejectedPolicyTypeEnum.getRejectedNameByType(registerParameter.getRejectedPolicyType().getType())) .executeTimeOut(registerParameter.getExecuteTimeOut()) .threadPoolId(registerParameter.getThreadPoolId()) .build(); return executorProperties; } }
这个类主要提供了一个方法用于注册线程池registerDynamicThreadPool,其继承了 AbstractDynamicThreadPoolService 这个抽象类,这个抽象类提供了一个buildDynamicThreadPoolExecutor 方法用于生成一个ThreadPoolExecutor对象,DynamicThreadPoolConfigService的registerDynamicThreadPool方法在buildDynamicThreadPoolExecutor方法的基础上将生成的ThreadPoolExecutor对象连同线程池参数一起放到ThreadPoolExecutorRegistry中存储(本质是一个Map),并为其设置了一个 ThreadPoolNotifyAlarm 放入GlobalNotifyAlarmManage管理。
DynamicThreadPoolAdapterRegister——第三方框架适配器注册 @Slf4j @AllArgsConstructor public class DynamicThreadPoolAdapterRegister implements InitializingBean { private final BootstrapConfigProperties bootstrapConfigProperties; public static final Map<String, AdapterExecutorProperties> ADAPTER_EXECUTORS_MAP = new ConcurrentHashMap <>(); @Override public void afterPropertiesSet () throws Exception { discoverAdapterExecutor(); } public AdapterExecutorProperties discoverAdapterExecutorAndGet (String mark) { List<AdapterExecutorProperties> adapterExecutors = bootstrapConfigProperties.getAdapterExecutors(); for (AdapterExecutorProperties each : adapterExecutors) { String buildKey = each.getMark() + IDENTIFY_SLICER_SYMBOL + each.getThreadPoolKey(); ADAPTER_EXECUTORS_MAP.putIfAbsent(buildKey, each); } return ADAPTER_EXECUTORS_MAP.get(mark); } public void discoverAdapterExecutor () { Optional<List<AdapterExecutorProperties>> adapterExecutorProperties = Optional.ofNullable(bootstrapConfigProperties.getAdapterExecutors()); adapterExecutorProperties.ifPresent(props -> { for (AdapterExecutorProperties each : props) { String buildKey = each.getMark() + IDENTIFY_SLICER_SYMBOL + each.getThreadPoolKey(); ADAPTER_EXECUTORS_MAP.putIfAbsent(buildKey, each); } }); } }
该类在afterPropertiesSet方法中调用了discoverAdapterExecutor来从bootstrapConfigProperties中加载所有的第三方框架适配器配置,并放到一个MAP中。
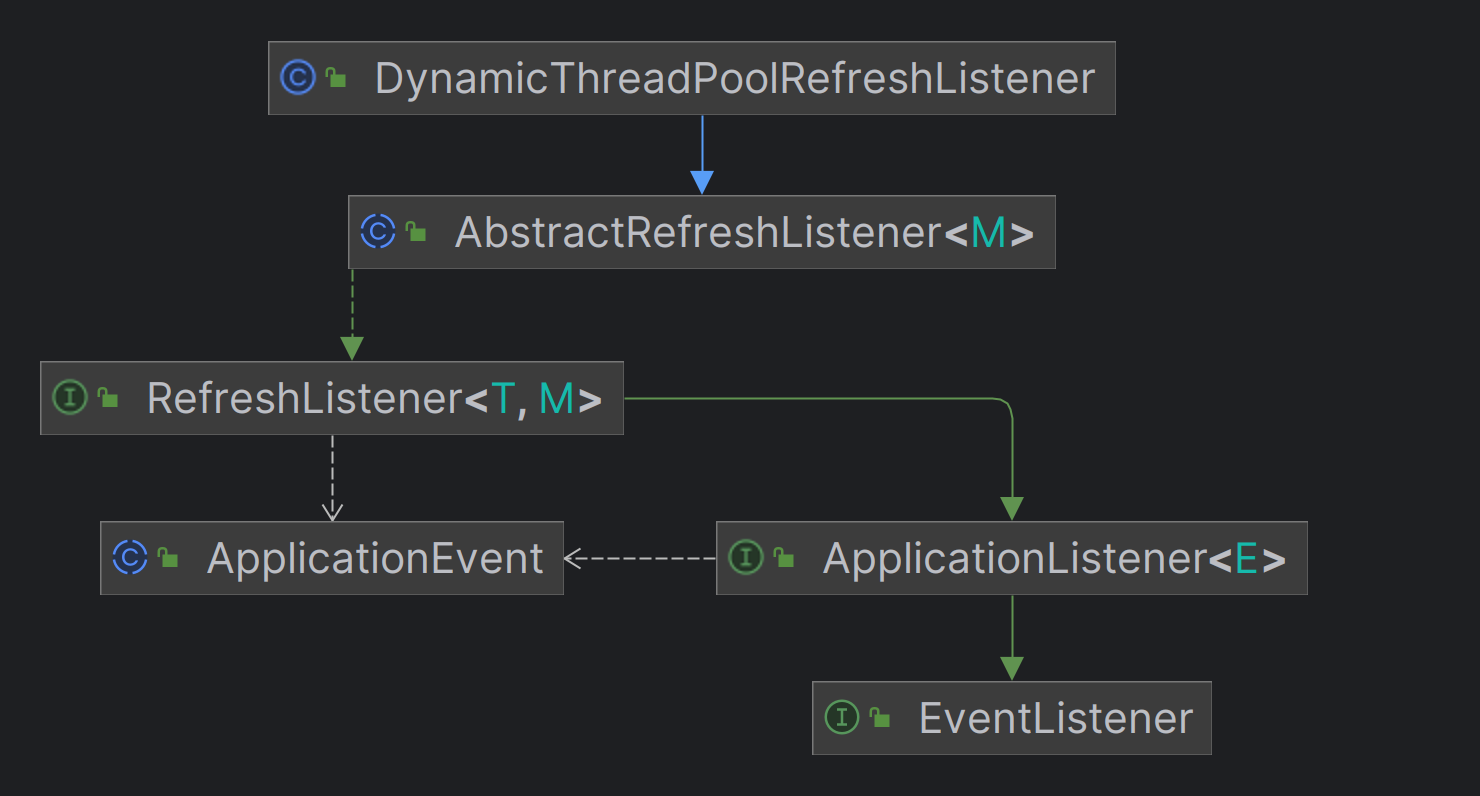
DynamicThreadPoolRefreshListener —— 线程池更新监听器 该模块继承关系如下:
其核心是 spring 提供的 ApplicationListener 和 ApplicationEvent,当某个ApplicationEvent发布到ApplicationContext时,监听这种 Event 的ApplicationListener就会收到事件,可以在onApplicationEvent中获取并处理这个事件。
public class DynamicThreadPoolRefreshListener extends AbstractRefreshListener <ExecutorProperties> { private final ThreadPoolConfigChange threadPoolConfigChange; private final ConfigModeNotifyConfigBuilder configModeNotifyConfigBuilder; private final ThreadPoolBaseSendMessageService threadPoolBaseSendMessageService; @Override public String getNodes (ExecutorProperties properties) { return properties.getNodes(); } @Override public void onApplicationEvent (ThreadPoolConfigDynamicRefreshEvent event) { BootstrapConfigProperties bindableConfigProperties = event.getBootstrapConfigProperties(); List<ExecutorProperties> executors = bindableConfigProperties.getExecutors(); for (ExecutorProperties properties : executors) { String threadPoolId = properties.getThreadPoolId(); if (!match(properties)) { continue ; } checkNotifyConsistencyAndReplace(properties); if (!checkConsistency(threadPoolId, properties)) { continue ; } dynamicRefreshPool(threadPoolId, properties); ThreadPoolExecutorHolder executorHolder = ThreadPoolExecutorRegistry.getHolder(properties.getThreadPoolId()); ExecutorProperties beforeProperties = executorHolder.getExecutorProperties(); executorHolder.setExecutorProperties(failDefaultExecutorProperties(beforeProperties, properties)); ChangeParameterNotifyRequest changeRequest = buildChangeRequest(beforeProperties, properties); log.info(CHANGE_THREAD_POOL_TEXT, threadPoolId, String.format(CHANGE_DELIMITER, beforeProperties.getCorePoolSize(), changeRequest.getNowCorePoolSize()), String.format(CHANGE_DELIMITER, beforeProperties.getMaximumPoolSize(), changeRequest.getNowMaximumPoolSize()), String.format(CHANGE_DELIMITER, beforeProperties.getQueueCapacity(), changeRequest.getNowQueueCapacity()), String.format(CHANGE_DELIMITER, beforeProperties.getKeepAliveTime(), changeRequest.getNowKeepAliveTime()), String.format(CHANGE_DELIMITER, beforeProperties.getExecuteTimeOut(), changeRequest.getNowExecuteTimeOut()), String.format(CHANGE_DELIMITER, beforeProperties.getRejectedHandler(), changeRequest.getNowRejectedName()), String.format(CHANGE_DELIMITER, beforeProperties.getAllowCoreThreadTimeOut(), changeRequest.getNowAllowsCoreThreadTimeOut())); try { threadPoolConfigChange.sendPoolConfigChange(changeRequest); } catch (Throwable ex) { log.error("Failed to send Chang smart application listener notice. Message: {}" , ex.getMessage()); } } } }
public class ThreadPoolConfigDynamicRefreshEvent extends ApplicationEvent { @Getter @Setter private BootstrapConfigProperties bootstrapConfigProperties; public ThreadPoolConfigDynamicRefreshEvent (Object source, BootstrapConfigProperties bootstrapConfigProperties) { super (source); this .bootstrapConfigProperties = bootstrapConfigProperties; } }
private void publishDynamicThreadPoolEvent (BootstrapConfigProperties configProperties) { ApplicationContextHolder.getInstance().publishEvent(new ThreadPoolConfigDynamicRefreshEvent (this , configProperties)); }
当通过ApplicationContextHolder.getInstance().publishEvent()发布一个ThreadPoolConfigDynamicRefreshEvent 后,实现了EventListener 的DynamicThreadPoolRefreshListener 就会调用 onApplicationEvent 方法处理这个ThreadPoolConfigDynamicRefreshEvent 。 这个方法的核心是修改线程池参数,核心代码如下:
private void dynamicRefreshPool (String threadPoolId, ExecutorProperties properties) { ExecutorProperties beforeProperties = ThreadPoolExecutorRegistry.getHolder(threadPoolId).getExecutorProperties(); ThreadPoolExecutor executor = ThreadPoolExecutorRegistry.getHolder(threadPoolId).getExecutor(); if (properties.getMaximumPoolSize() != null && properties.getCorePoolSize() != null ) { ThreadPoolExecutorUtil.safeSetPoolSize(executor, properties.getCorePoolSize(), properties.getMaximumPoolSize()); } else { if (properties.getMaximumPoolSize() != null ) { executor.setMaximumPoolSize(properties.getMaximumPoolSize()); } if (properties.getCorePoolSize() != null ) { executor.setCorePoolSize(properties.getCorePoolSize()); } } if (properties.getAllowCoreThreadTimeOut() != null && !Objects.equals(beforeProperties.getAllowCoreThreadTimeOut(), properties.getAllowCoreThreadTimeOut())) { executor.allowCoreThreadTimeOut(properties.getAllowCoreThreadTimeOut()); } if (properties.getExecuteTimeOut() != null && !Objects.equals(beforeProperties.getExecuteTimeOut(), properties.getExecuteTimeOut())) { if (executor instanceof DynamicThreadPoolExecutor) { ((DynamicThreadPoolExecutor) executor).setExecuteTimeOut(properties.getExecuteTimeOut()); } } if (properties.getRejectedHandler() != null && !Objects.equals(beforeProperties.getRejectedHandler(), properties.getRejectedHandler())) { RejectedExecutionHandler rejectedExecutionHandler = RejectedPolicyTypeEnum.createPolicy(properties.getRejectedHandler()); executor.setRejectedExecutionHandler(rejectedExecutionHandler); } if (properties.getKeepAliveTime() != null && !Objects.equals(beforeProperties.getKeepAliveTime(), properties.getKeepAliveTime())) { executor.setKeepAliveTime(properties.getKeepAliveTime(), TimeUnit.SECONDS); } if (properties.getQueueCapacity() != null && !Objects.equals(beforeProperties.getQueueCapacity(), properties.getQueueCapacity()) && Objects.equals(BlockingQueueTypeEnum.RESIZABLE_LINKED_BLOCKING_QUEUE.getName(), executor.getQueue().getClass().getSimpleName())) { if (executor.getQueue() instanceof ResizableCapacityLinkedBlockingQueue) { ResizableCapacityLinkedBlockingQueue<?> queue = (ResizableCapacityLinkedBlockingQueue<?>) executor.getQueue(); queue.setCapacity(properties.getQueueCapacity()); } else { log.warn("The queue length cannot be modified. Queue type mismatch. Current queue type: {}" , executor.getQueue().getClass().getSimpleName()); } } }
可以更新以下几个参数:
MaximumPoolSize 最大线程数
CorePoolSize
AllowCoreThreadTimeOut
ExecuteTimeOut
RejectedExecutionHandler
KeepAliveTime
QueueCapacity
参数说明
MaximumPoolSize
MaximumPoolSize
最大线程数
CorePoolSize
核心线程数
AllowCoreThreadTimeOut
是否允许核心线程超时
ExecuteTimeOut
任务执行超时时间(hippo4j 特有,任务执行超时后会报警)
RejectedExecutionHandler
拒绝策略
KeepAliveTime
线程保活时间
QueueCapacity
队列容量,仅 hippo4j 的 ResizableCapacityLinkedBlockingQueue 支持
线程数量 对于 MaximumPoolSize 和 CorePoolSize 主要依靠 executor 本身提供的 setMaximumPoolSize 和 setCorePoolSize 方法实现:
public void setMaximumPoolSize (int maximumPoolSize) { if (maximumPoolSize <= 0 || maximumPoolSize < corePoolSize) throw new IllegalArgumentException (); this .maximumPoolSize = maximumPoolSize; if (workerCountOf(ctl.get()) > maximumPoolSize) interruptIdleWorkers(); }
public void setCorePoolSize (int corePoolSize) { if (corePoolSize < 0 || maximumPoolSize < corePoolSize) throw new IllegalArgumentException (); int delta = corePoolSize - this .corePoolSize; this .corePoolSize = corePoolSize; if (workerCountOf(ctl.get()) > corePoolSize) interruptIdleWorkers(); else if (delta > 0 ) { while (k-- > 0 && addWorker(null , true )) { if (workQueue.isEmpty()) break ; } } }
但是需要注意当同时需要修改最大线程数和核心线程数时,需要注意先后顺序,参见关于设置 corePoolSize 和 maxPoolSize 报 IllegalArgumentException · Issue #1063 · opengoofy/hippo4j · GitHub
在同时调整两个参数时,原来的核心线程数是 10,最大线程数是 15,修改成核心线程数是 20,最大线程数是 30,如果先设置了核心线程,在执行 if (corePoolSize < 0 || maximumPoolSize < corePoolSize) 时,会出现核心线程数小于最大线程数的问题。同理如果调小了线程数量,错误的顺序也会导致这个问题出现,因此需要根据最大线程数的增减决定操作顺序。
是否允许核心线程超时 public void allowCoreThreadTimeOut (boolean value) { if (value && keepAliveTime <= 0 ) throw new IllegalArgumentException ("Core threads must have nonzero keep alive times" ); if (value != allowCoreThreadTimeOut) { allowCoreThreadTimeOut = value; if (value) interruptIdleWorkers(); } }
任务执行超时时间 public void setExecuteTimeOut (Long executeTimeOut) { getPluginOfType(TaskTimeoutNotifyAlarmPlugin.PLUGIN_NAME, TaskTimeoutNotifyAlarmPlugin.class) .ifPresent(processor -> processor.setExecuteTimeOut(executeTimeOut)); }
如果某个任务执行时间超过指定值会触发一些报警行为,这里可以设置这个阈值,注意该配置为 hippo4j 特有。
拒绝策略 这个没什么好说的,实例化一个新的 RejectedExecutionHandler,然后直接替换成这个 handler 就好了
public void setRejectedExecutionHandler (RejectedExecutionHandler handler) { if (handler == null ) throw new NullPointerException (); this .handler = handler; }
线程保活时间 public void setKeepAliveTime (long time, TimeUnit unit) { if (time < 0 ) throw new IllegalArgumentException (); if (time == 0 && allowsCoreThreadTimeOut()) throw new IllegalArgumentException ("Core threads must have nonzero keep alive times" ); long keepAliveTime = unit.toNanos(time); long delta = keepAliveTime - this .keepAliveTime; this .keepAliveTime = keepAliveTime; if (delta < 0 ) interruptIdleWorkers(); }
阻塞队列长度 这个是最后一个可配置项,也是 hippo4j 特有的配置项,只有选用了 hippo4j 所提供的 ResizableCapacityLinkedBlockingQueue 可变长度阻塞队列才可以修改。这个阻塞队列的实现也很简单,可以看下代码注释中的描述:
A clone of java.util.concurrent.LinkedBlockingQueue with the addition of a setCapacity(int) method, allowing us to change the capacity of the queue while it is in use
其实只是把 LinkedBlockingQueue 中的 capacity 的 final 去掉了,并且增加了一个 setCapacity 的方法。这里可能会有疑惑🤔,不是说 LinkedBlockingQueue 是无界的吗,其实虽然我们通常称其为一个无界队列,但是是可以人为指定队列大小的,而且由于其用于记录队列大小的参数是 int 类型字段,所以通常意义上的无界其实就是队列长度为 Integer. MAX_VALUE,且在不指定队列大小的情况下也会默认队列大小为 Integer. MAX_VALUE。
关于 ResizableCapacityLinkedBlockingQueue 有一些不同的实现方案,可以参考今天,说一说线程池 “动态更新”(三)-鸿蒙开发者社区-51CTO.COM ,其实 hippo4j 的实现类似于第一种,但是由于本场景并不涉及多个线程同时修改容量,所以也没有加 synchronized 锁。其原理如下:
private final ReentrantLock putLock = new ReentrantLock (); private final Condition notFull = putLock.newCondition();private int capacity;public void put (E o) throws InterruptedException { if (o == null ) { throw new NullPointerException (); } final ReentrantLock putLock = this .putLock; final AtomicInteger count = this .count; putLock.lockInterruptibly(); try { try { while (count.get() >= capacity) { notFull.await(); } } catch (InterruptedException ie) { notFull.signal(); throw ie; } insert(o); c = count.getAndIncrement(); if (c + 1 < capacity) { notFull.signal(); } } finally { putLock.unlock(); } if (c == 0 ) { signalNotEmpty(); } } public void setCapacity (int capacity) { final int oldCapacity = this .capacity; this .capacity = capacity; final int size = count.get(); if (capacity > size && size >= oldCapacity) { signalNotFull(); } } private void signalNotFull () { final ReentrantLock putLock = this .putLock; putLock.lock(); try { notFull.signal(); } finally { putLock.unlock(); } }
在 Put 操作的时候会首先申请可重入锁,如果 count.get() >= capacity 就会调用 notFull 这个 Condition 的 await 方法阻塞,这时会释放可重入锁,此时另一个线程扩大容量就会调用 signalNotFull 方法,该方法会申请到可重入锁,同时会调用 notFull 这个 Condition 的 Signal 方法通知阻塞的 put 线程,容量未满,并释放锁。这样 put 线程就可以被唤醒并重新获取可重入锁,完成 put 操作。
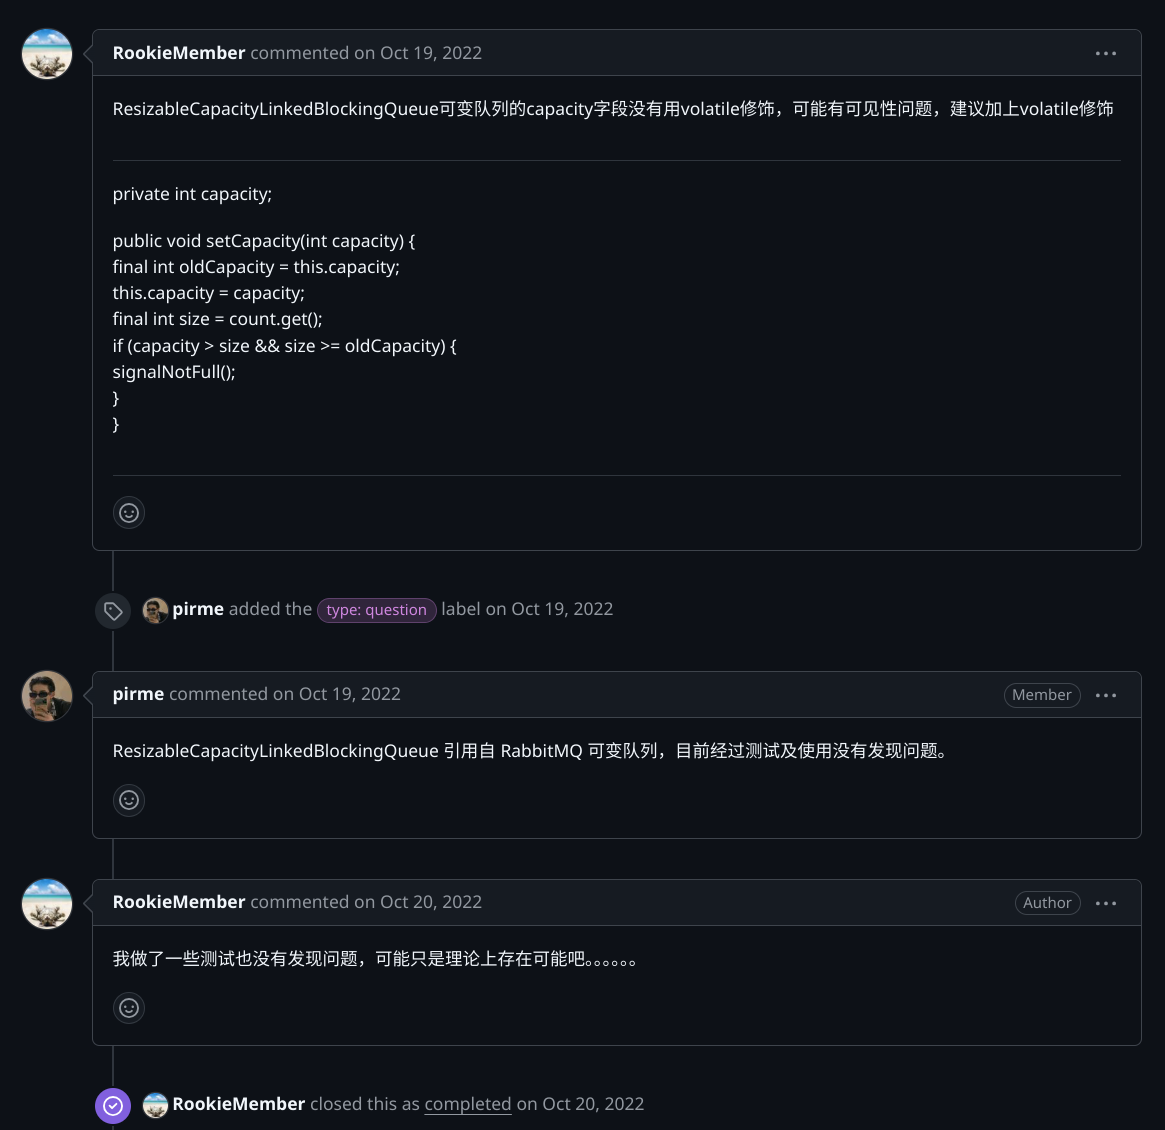
但这里我比较疑惑的是为什么 capacity 并没有加 volatile 关键字来保证多线程情况下的可见性,这难道不会导致增大了容量但该修改对其他正在执行 put 操作的阻塞线程不可见进而造成该线程一直阻塞吗?
为此我去查了一下相关 Issue:ResizableCapacityLinkedBlockingQueue可变队列的capacity字段可见性问题 · Issue #808 · opengoofy/hippo4j · GitHub
项目开发者给出的说法是:
ResizableCapacityLinkedBlockingQueue 引用自 RabbitMQ 可变队列,目前经过测试及使用没有发现问题。
那么到底是如何保证可见性的呢?这里我单独写了篇文章分析这个问题:[[hippo4j的可变长度阻塞队列为什么不需要volatile]]hippo4j的可变长度阻塞队列为什么不需要volatile | Echo
未完待续~
参考资料:
Java线程池实现原理及其在美团业务中的实践 Bean 的生命周期了解么? hippo4j document ApplicationContextAware详解用法 Spring中的ApplicationListener的使用详解案例(观察者模式) 今天,说一说线程池 “动态更新”(三)-鸿蒙开发者社区-51CTO.COM 线程池的三种队列区别:SynchronousQueue、LinkedBlockingQueue 和ArrayBlockingQueue_synchronousqueue 线程池-CSDN博客 详解 Java Condition 的 await 和 signal 等待通知机制 | 二哥的Java进阶之路 深度好文 | Java 可重入锁内存可见性分析

